HEADER BLOG TITLE
Showing posts with label Crochet pentagon pattern. Show all posts

22/01/2014

Star-shaped Pillow


I grabbed a 5 mm crochet hook and white cotton yarn last week and hooked this scatter cushion (12 pentagons) to show you I can also make something that is neither scarf nor throw!  I am finally enjoying the pure joy of hooking in monochrome but have to admit that I started a throw resembling a patchwork blanket a few days ago.  I am still keeping it under wraps to see whether I like the way it is turning out, but so far so good! 

What are you working on?  I see many bloggers are participating in the Crochet Mood Blanket CAL and it is interesting to see what associations all the bloggers are making between colour, design and emotion.  What a spectacular idea!


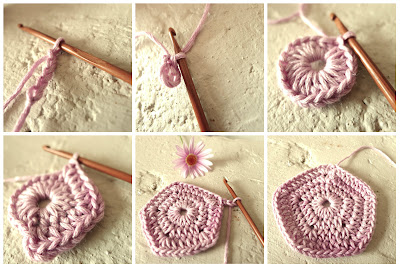
Pentagon Amigurumi Pattern:

Row 1: Ch4, close to form ring
Row 2: Ch1 to form first sc, 9 sc = 10 sc
Row 3: ch2, sc in same space (first corner), sc in next st, *sc, ch1, sc in next st to form second corner; sc in next st* repeat 4 times
Row 4: ch2, sc in same space (first corner), sc in next 2 st, *sc, ch1, sc in next st to form second corner; sc in next 2 st* repeat 4 times
Row 5: ch2, sc in same space (first corner), sc in next 3 st, *sc, ch1, sc in next st to form second corner; sc in next 3 st* repeat 4 times
Repeat until desired size, in this case 12 rounds with a 5 mm hook in Raeesah Cotton Yarn


12 Pentagons assembled as per above images result in a round ball. 
 In order to achieve a star, place the two halves to fit exactly on one another, point to point, side to side.


08/12/2012

Roly Poly Pillow Seat and Pentagon Pattern

While some parts of the world are currently covered in snowy white, we are living in a country covered in colour during the long Southern Hemisphere summers! The Roly Poly Pillow Seat fits right into this image but I can only show you the deflated version at the moment. Stuffing of the ball will take place later this month and I cannot wait to see the ball in it's full splendour - only then will it be possible to truely appreciate the beautiful yarn, colours and design. If you haven't hooked anything in Vinnis Nikkim Colours yet, this is an amazing 100% cotton yarn that I cannot recommend enough!

 The 12 pentagons hooked in different colours


I hooked the pentagons with a 3,75mm hook rather than the recommended 4mm as I wanted to achieve a slightly denser look. The ball was hooked in half double stitches [hdc].

Round 1. Chain 4, close to form ring.  Chain 2 to form first stitch. Hook another 19 hdc and close round with slip stitch. Total stitches = 20.

Round 2. This round will increase by 5 stitches. Chain 3 to form first stitch and single chain. Then in same space hook 1hdc. This will form the first corner. Hook 1 hdc in each of the following 3 spaces. Then in fourth space to create second of five corners: hdc, ch, hdc. Repeat to create 5 corners. This round = 25 hdc in total.

Round 3. Chain 3 to form stitch and single chain. Then in same space hook 2hdc.Hook 1 hdc in each of the following spaces until you reach the corner. In corner space: 2hdc, ch, 2hdc. Repeat until you reach the first stitch. THEN hook another hdc in the corner and slipstitch before going into second round. This round = 40 hdc in total.

Round 4. This round = 45 hdc in total.

Round 5. This round = 60 hdc in total.


NOTE: You will see that the corners of every odd round [starting round three] = 2hdc, ch, 2hdc. Every even round [starting round two] = 1hdc, ch, 1hdc. This resulted in a flat Pentagon. I always join the next round in a corner in order to hide the joins between rounds as demonstrated here. For these pentagons it meant that during the odd rounds you need to hook one last hdc in the corner before slipping into the first one in order to ensure 2hdc, ch, 2hdc for that round.

Thanks for stopping by - Cheers!